TEC® Products Spell Success for Gauged Porcelain Panel Installation at Kent State University
Gauged Porcelain Tile Panels (GPTP) continue to grow in popularity. They provide a sleek, modern look that appeals to designers, architects and owners. For tile contractors, these projects can be a great way to grow business. However, experienced GPTP installers have learned to carefully consider all aspects of the installation to complete the project successfully.
Panel Handling
Panels qualify as GPTP if they are 3.5 – 6.5 mm thick (1/8"-1/4"), with tile sizes reaching up to 1.5M x 3M (5' X 10'). Because of their size, contractors usually add manpower to the job. A minimum of two people are required for handling the panels – with many contractors scheduling three people – an important consideration for accurate bids.
Additionally, panel delivery and movement must be carefully planned out. Consider the exact route the panels will travel to get to the installation site and plan for any challenges such as unloading, building entry, tight hallways, stairwells or elevators. If panels are not immediately being installed, secure an on-site storage area large enough to accommodate the panels safely.

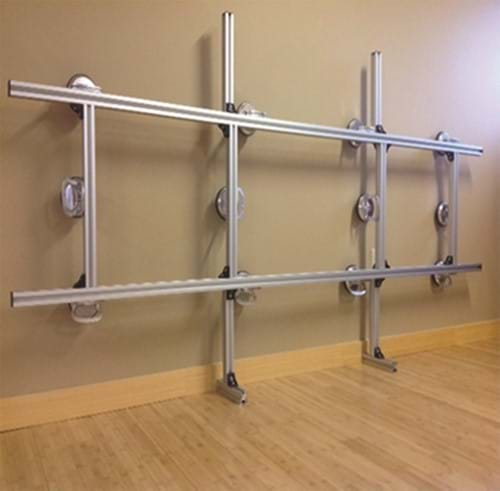
Recently, Ryan Carpet of Austintown, Ohio faced the challenge of managing 1M x 3M (3.3’ x 9.8’) Laminam® panels for the remodel of the women’s, men’s and universal restrooms in the Kent Student Center at Kent State University. The beautiful blue gauged porcelain panel tiles had to be transported carefully through the Student Center to the three restroom areas. With a tight summer timetable, multiple trades working in tandem and a relatively small project space, Ryan made sure to do the additional planning needed for the movement and cutting of the GPTP. Frames with suction cups designed for these types of panels made it easier to handle them safely. Ryan had sufficient manpower at the site, so that at least two team members were available for lifting and supporting the panels.

Use the Right Tools
GPTP projects cannot be done without a number of special tools. In addition to the frames / suction cups mentioned earlier, forks and extended forks are needed. GPTP come in oversized crates, so extended forks that are a minimum of 84” are required for proper unloading. Additionally, a large heavy-duty table is critical to support the entire panel for application of the mortar. Special trowels are designed for use with GPTPs that encourage mortar ridge collapse without shifting the tile back and forth to collapse the ridges. A square notch trowel would require the panel to be shifted back and forth, which is almost impossible with tile this large.
Surface Prep and Substrate Needs
For any GPTP project, contractors must review the strict requirements for wall, ceiling and floor substrates set by the IRC (residential) and IBC (commercial). Ansi.org offers complete information, but here are some tips for a successful installation.
1) GPTP can never be bonded to a wood frame surface. Wood-based panels expand and contract with changes in moisture content, which causes an unstable environment for the panels.
2) Substrates must be clean, dry, flat bondable surfaces and conform with IRC/IBC standards, or local building codes. They must also be free of all contaminants such as sealers, cleaning or curing compounds, coatings, oil and loose surface material. Extremely flat substrate surfaces are a necessity due to the large size and thinness of the panels. To avoid failures, see manufacturer instructions for exact requirements and prepare the substrate accordingly.
3) GPTPs can be direct bonded to the following wall and ceiling backing board and panel types: cementitious backer unit, fiber-cement backer board, glass mat water-resistant gypsum backer board, fiber-reinforced gypsum panel and gypsum board/drywall (dry areas only).
4) GPTPs for floors can be direct bonded to clean, sound, dimensionally stable concrete or cured bonded and unbonded mortar beds.*

Installation Products and Techniques
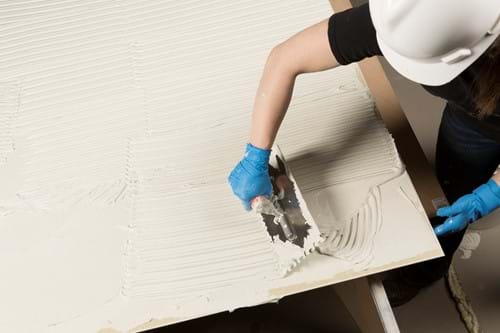
The popularity of these panels have brought about next generation mortars. These mortars combine great handling properties with better slip and slump capabilities, along with long open time, long bucket life, and faster set times. Both thixotropic and pseudoplastic mortars work for GPTP depending on the project needs. Not all A118.15 mortars are designed for large format tile like GPTP, and installers should ensure the suitability of the mortar for the application. TEC® Ultimate 6 Plus Mortar is ideal for GPTP installations because it significantly increases the coverage achieved and has exceptional non-sag / non-slump characteristics for wall and floor applications. It has an extended open time and pot life, and superior transfer capabilities.
For installing GPTP, the recommended method is to trowel parallel to the shortest tile edge, on the substrate. Remember to keep the lines on the substrate as straight as possible. On the GPTP, mortar must be troweled on the back of the tile. Mortar ridges should be parallel to the shortest edge. Trowel from the middle of the shortest edge outward and repeat on the other side. This should form a straight line dam down the middle of the tile where the trowel ridges from each side meet.
For floor applications the tile must then be lifted using a rack and installed over the troweled substrate. Then, to embed the tile in the mortar installers should walk down the center of the longest edge before returning to the center of the tile and shuffling towards the shortest edge, being sure to take small steps to squeeze out air. Repeat this shuffle from middle to edge until the entire tile is embedded. For more detail, see ANSI A108.19.

For the Kent Student Center restroom remodel, Ryan Carpet chose TEC Ultimate 6 Plus Mortar because of its ease-of-use and performance. Steve Eickelman, Sales Manager, commented: “my team really likes how creamy Ultimate 6 Plus is for troweling and yet holds it shape just right for setting gauged panels. They really appreciate having enough time to get full coverage and make adjustments. And, being able to grout just six hours after installation, saves us time.” Eickelman went on to explain that Ryan starts every tile project at Kent State University with TEC HydraFlex™ Waterproofing and Crack Isolation Membrane to protect the installations. Since the restrooms had not been updated in many years, the substrates were in poor condition and nearly all had to be replaced. Ryan made sure all of the older walls were smooth and flat. The surfaces were then ready for the Laminam installation. The team built their own large table to make it easier to apply the mortar to the nearly 10’ panels.
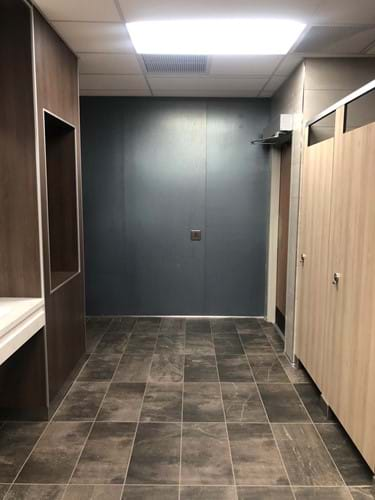
The job was finished with TEC Power Grout® for its stain proof,** strong, color consistent joints – a smart choice for the high traffic restrooms.
GPTP installations require extra attention to process and detail but are worth the effort for the business building opportunities they can bring. Tile contractors can enjoy the benefits of this tile trend by staying on top of the latest installation tips and techniques through reading industry communications and attending trainings.
*Mortar bed must conform to mortar bed requirements in ANSI A108.1B. Under normal job conditions, a minimum of 20 hours cure at 70°F (21°C) is adequate, but longer mortar bed cures up to 10 days are desirable
**Power Grout is stain proof to most common water based stains when cleaned immediately. The prolonged exposure of any stain will increase the likelihood of permanent staining or discoloration of grout surface.